

[ENG] Working with Eclipse IDE for Arduino Projects (C/C++ or ino files)
Hello All,
We all know that it is very easy to use the Arduino integrated development environment (IDE) to begin simple projects with Arduino. However when the project complexity goes up, the Arduino IDE turns out into a problem to develop your project, mainly because it's limited IDE features for complex developments.
At this time it is very requested to use a professional IDE like Eclipse in order to develop complex Arduino projects.
In this post i will show to you how to download, configure and use Eclipse IDE for Arduino projects using both ino project files (based in C++) or regular C/C++ project an files.
1.) Download latest Eclipse for IDE for C/C++ programming languages (Eclipse C/C++ IDE for Neon.3 at the time that i was writing this post)

I choose to download the Eclipse for Windows 10 (64 bits), but make your choice accordingly to your operating system.
2.) Extract the eclipse to your "C:\" folder (this is very recommended to avoid errors because long path for files inside Eclipse sub folders). I have used winrar evaluation version to extract, however you can do this with any other unzip software (7-zip for example).

I have uncompressed the files to the following folder: C:\eclipse-arduino
3.) Run eclipse executable (eclipse.exe @ Windows 10) and configure the Arduino plugin (Sloeber V4)
3.1) Configure the workspace directory as you want (i have chosen the default workspace folder into my user space).

3.2) Jump to the workbench (clicking on the red mark on below picture)

3.3) click on menu Help > Eclipse Marketplace

3.4) Search for Arduino on Find textbox (marked with the red square on the below picture), and install The Arduino Eclipse plugin named Sloeber V4 clicking on install button for this plugin (marked with the red circle in the below picture).

3.5) if appear a security warning regarding unsigned content, please continue with the installation clicking on OK (marked with a red circle in the picture below)

3.6) When the installation has finished, eclipse will ask to restart the IDE, move forward clicking in Yes.

3.7) After Eclipse restart, the Arduino plugin will download the remaining files needed to complete the installation (for example it will download the compiler avr-gcc for atmel microcontrollers and many other necessary files).

3.8) After Arduino plugin finish it's installation, Eclipse start-up screen will appear again, move forward clicking on go to workbench button. Then if everything had been installed appropriately you will see the Eclipse screen configured to Arduino projects (see picture below).

The main difference will be the buttons highlighted by the red square in the above picture, which represents the following Arduino buttons:
* Verify (compile);
* Upload sketch (compile);
* New sketch;
* Save sketch;
* Open serial monitor;
* Open plotter.
4) create a project, compile and run at Arduino
4.1) Plug your Arduino at the USB port (i am using a Arduino Uno for this post), and see at the device manager port designated to the Arduino board (in my case was COM6).
4.2) Click on the New Sketch button to create a new Arduino Project

4.2) Name de project as you want under the project name textbox. Click Next.

4.3) Configure the platform and board options
* Configure the Platform folder (clicking on the list button it will appear automatically the Arduino/Avr/Atmel platform folder to you choose);
* Configure the arduino board (in my case i have chosen my Arduino Uno board);
* Configure the upload protocol (always Default for regular arduino boards);
* Choose the Arduino communication port (in my case it only appeared COM6).

Click Next.
4.4) Choose the project default file type
* For the ino version choose "Default ino file"
* For C/C++ version choose "Default cpp file" (and jump to section 5.)
* For sample sketchs choose "Sample sketch"

Click Finish
4.5) For ino default project Follow from this point up to section 4.7. After you pass through the last step, you will see the screen in the below picture.

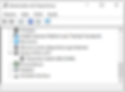
Click on 1 to expand the recent created test project folder. You will see the sub folders and the test.ino file.
Double click on 2 to open the test.ino file. You will see the setup function (mark as 3) and loop function (mark as 4) as usual to respectively setup your board and run the loop firmware that you will develop.
In order to test something i have caught the code from led blink example at arduino site (https://www.arduino.cc/en/Tutorial/Blink) and put inside setup and loop functions.
4.6) Compile the code clicking on verify button (marked in the below picture in red circle).

4.7) Transfer the code to the Arduino board clicking on upload sketch button (marked with a red circle in the picture below).

When you click for the first time in upload button, it will be prompted the below pop-up asking if you want to build before upload. In my particular case i prefer to click in always to guarantee that it will always build before make an upload (you can change your preference later in the menu preferences > arduino to set/change).

5th) For the Arduino C/C++ project version, after the step 4.4 you need to following the next steps to setup your C/C++ Arduino project.
5.1) Choose "Default cpp file" option to create your arduino c/c++ project files.

5.2) After the wizard is done, you will see that the C/C++ project option will create the files test.cpp and test.h for your project. You can access any includes from arduino at the includes sub-folder.
* Compile clicking on Verify button

5.3) Dowload your code clicking on upload sketch button.

6) Video from board downloading and running the firmware
Then you are done!!! Happy coding!!!
![[PT-BR] Google Assistant + Raspberry Pi: Comandos de voz para acionamento de cargas (Automação Resid](https://static.wixstatic.com/media/630072_5b692300d4fe4a529ae66d294131cadf~mv2.png/v1/fill/w_220,h_123,fp_0.50_0.50,q_95,enc_auto/630072_5b692300d4fe4a529ae66d294131cadf~mv2.png)
![[PT-BR] Raspberry Pi + Blynk: Acionamento de carga AC (Automação Residencial com Smartphone)](https://static.wixstatic.com/media/630072_e7f0b87d215a4fd8956d87d88990a017~mv2.png/v1/fill/w_220,h_123,fp_0.50_0.50,q_95,enc_auto/630072_e7f0b87d215a4fd8956d87d88990a017~mv2.png)

![[ENG] Hantek 6022BL Oscilloscope (basic and cheap items for a maker laboratory)](https://static.wixstatic.com/media/630072_fd3be8015ef74e1b913afe014c9ac08f~mv2_d_2768_3024_s_4_2.jpg/v1/fill/w_38,h_42,fp_0.50_0.50,q_90,enc_auto/630072_fd3be8015ef74e1b913afe014c9ac08f~mv2_d_2768_3024_s_4_2.jpg)
![[ENG] AD9850 signal generator + Arduino (basic and cheap items for a maker laboratory)](https://static.wixstatic.com/media/630072_0a08ce3d5e694603be1aee262d3bd2e0~mv2.png/v1/fill/w_38,h_31,fp_0.50_0.50,q_95,enc_auto/630072_0a08ce3d5e694603be1aee262d3bd2e0~mv2.png)
![[PT-BR] Google Assistant + Raspberry Pi: Comandos de voz para acionamento de cargas (Automação Resid](https://static.wixstatic.com/media/630072_5b692300d4fe4a529ae66d294131cadf~mv2.png/v1/fill/w_38,h_25,fp_0.50_0.50,q_95,enc_auto/630072_5b692300d4fe4a529ae66d294131cadf~mv2.png)
![[PT-BR] Raspberry Pi + Blynk: Acionamento de carga AC (Automação Residencial com Smartphone)](https://static.wixstatic.com/media/630072_e7f0b87d215a4fd8956d87d88990a017~mv2.png/v1/fill/w_38,h_30,fp_0.50_0.50,q_95,enc_auto/630072_e7f0b87d215a4fd8956d87d88990a017~mv2.png)
![[PT-BR] Análise de desempenho do osciloscópio Hantek 6022BL e gerador de funções DDS AD9850 (Itens b](https://static.wixstatic.com/media/630072_7165ceafaee44b0baa6a1b64bde02b75~mv2.png/v1/fill/w_38,h_29,fp_0.50_0.50,q_95,enc_auto/630072_7165ceafaee44b0baa6a1b64bde02b75~mv2.png)

![[PT-BR] Osciloscópio Hantek 6022BL (Itens básicos e baratos para laboratório maker)](https://static.wixstatic.com/media/630072_de31bb2958c24c25a94dbffdeac66782~mv2_d_4032_3024_s_4_2.jpg/v1/fill/w_38,h_29,fp_0.50_0.50,q_90,enc_auto/630072_de31bb2958c24c25a94dbffdeac66782~mv2_d_4032_3024_s_4_2.jpg)
![[PT-BR] Gerador de sinais AD9850 + Arduino (Itens básicos e baratos para laboratório maker)](https://static.wixstatic.com/media/630072_252222da5cb74a8e9e731f80932ea647~mv2.png/v1/fill/w_38,h_28,fp_0.50_0.50,q_95,enc_auto/630072_252222da5cb74a8e9e731f80932ea647~mv2.png)
![[PT-BR] Trabalhando com IDE Eclipse para projetos Arduino (com arquivos C/C++ ou ino)](https://static.wixstatic.com/media/630072_015e4254b3564c778bbc5078252a746f~mv2.png/v1/fill/w_38,h_37,fp_0.50_0.50,q_95,enc_auto/630072_015e4254b3564c778bbc5078252a746f~mv2.png)
![[ENG] Working with Eclipse IDE for Arduino Projects (C/C++ or ino files)](https://static.wixstatic.com/media/630072_8ab3e266a7b147f6a89ae44ef3bbd68b~mv2.png/v1/fill/w_38,h_25,fp_0.50_0.50,q_95,enc_auto/630072_8ab3e266a7b147f6a89ae44ef3bbd68b~mv2.png)
![[PT-BR] Controlando uma matrix de led 8x8 com Arduino/Funduino Pro Mini](https://static.wixstatic.com/media/630072_17c9d6821fa74fbf8dc4f4372ce3a5e8~mv2.png/v1/fill/w_38,h_35,fp_0.50_0.50,q_95,enc_auto/630072_17c9d6821fa74fbf8dc4f4372ce3a5e8~mv2.png)